
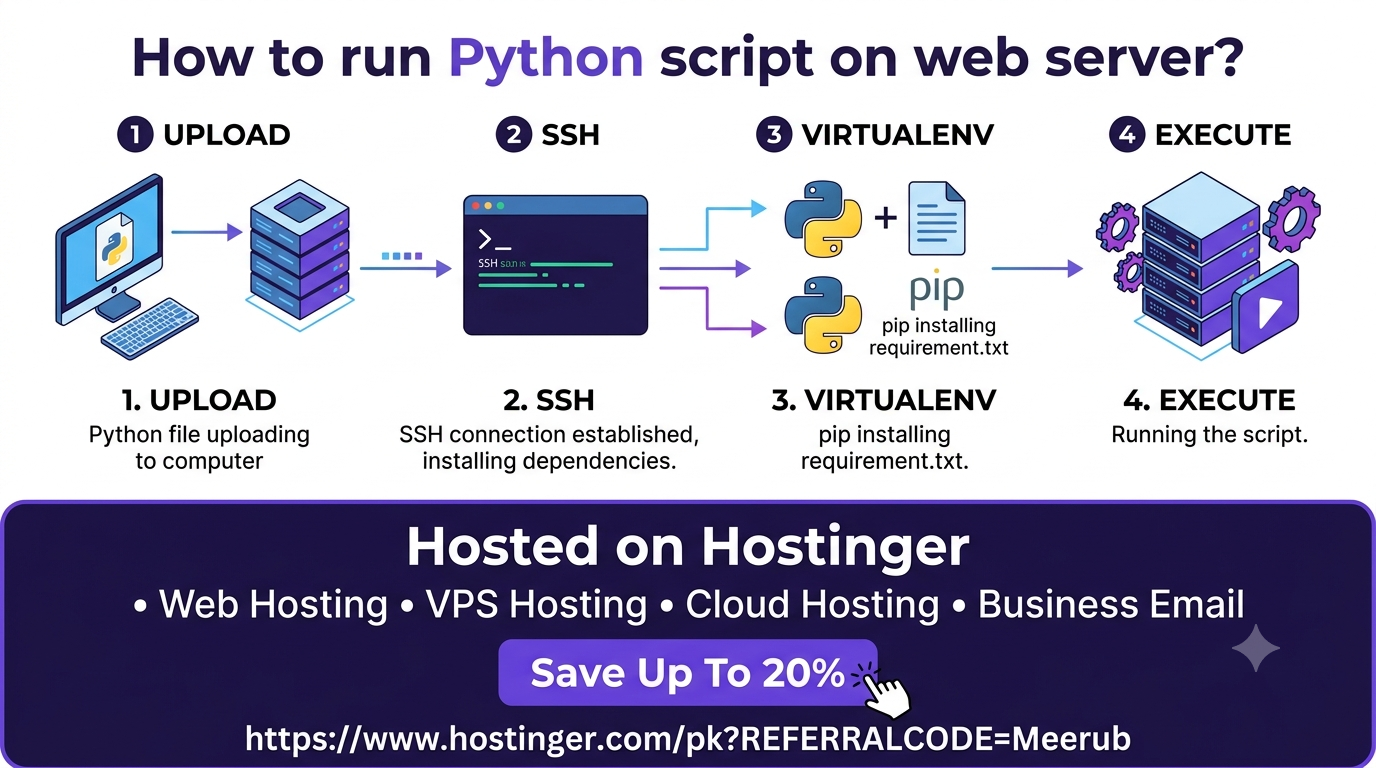
To run a Python script on a web server, upload your code to a Virtual Private Server (VPS), install Python along with your project dependencies, and execute the script via an SSH terminal session. For continuous backend scripts or web applications, configure process managers like Systemd or WSGI servers (such as Gunicorn) paired with Nginx to ensure 24/7 background execution and automatic restarts.
How to Run a Python Script on a Web Server: A Step-by-Step Guide
Executing Python scripts on a local computer works well for development, but production environments require the power, uptime, and accessibility of a remote web server. Moving your Python scripts to a cloud server guarantees that your web scrapers, data pipelines, automation bots, and REST APIs run continuously without relying on a local machine.
Whether you are deploying a simple automation script or a full-stack Flask/Django web application, this comprehensive guide covers the exact methods and technical configurations needed to run Python scripts smoothly on remote web servers.
4 Core Methods to Execute Python on a Web Server
Depending on your script’s purpose, choosing the right execution method determines performance, stability, and ease of management.
Method 1: Direct Command-Line Execution (SSH)
Ideal for one-time execution, manual debugging, or quick data processing tasks.
-
Connect to your server using SSH:
Bashssh ubuntu@your_server_ip -
Navigate to your project folder and run your script using Python 3:
Bashpython3 script.py
Note: Closing your SSH session will kill foreground processes. For persistent command-line execution, use utility tools like
nohuportmux.
Method 2: Scheduled Background Execution via Cron Jobs
Best for repetitive tasks that must run on a schedule, such as generating daily reports, clearing database caches, or running scheduled web scrapers.
-
Open the crontab editor on your Linux server:
Bashcrontab -e -
Add a cron schedule entry. For instance, to execute a script every day at midnight:
Bash0 0 * * * /usr/bin/python3 /home/ubuntu/my_project/script.py >> /home/ubuntu/my_project/output.log 2>&1
Method 3: Continuous Daemon Management with Systemd
Best for continuous processes such as Telegram/Discord bots, WebSocket connections, and background task queues that must run 24/7 and restart automatically if the server reboots.
-
Create a custom systemd unit file:
Bashsudo nano /etc/systemd/system/mypythonapp.service -
Define the service configuration:
Ini, TOML[Unit] Description=Continuous Python Worker Service After=network.target [Service] User=ubuntu WorkingDirectory=/home/ubuntu/my_project ExecStart=/home/ubuntu/my_project/venv/bin/python3 /home/ubuntu/my_project/script.py Restart=always RestartSec=5 [Install] WantedBy=multi-user.target -
Enable and start your background service:
Bashsudo systemctl daemon-reload sudo systemctl start mypythonapp.service sudo systemctl enable mypythonapp.service
Method 4: Production Web Deployment (Gunicorn/Uvicorn + Nginx)
Essential for Python web frameworks like Flask, FastAPI, and Django that need to handle incoming HTTP requests from public web users.
-
WSGI/ASGI Server (Gunicorn/Uvicorn): Acts as the interface between Python and the web web server to execute application code across multiple CPU workers.
-
Nginx Reverse Proxy: Sits in front of Gunicorn to manage incoming HTTP traffic, serve static assets, handle SSL certificates, and protect against security vulnerabilities.
Step-by-Step Technical Guide: Deploying Python on Hostinger VPS
To ensure maximum control, root access, and unthrottled performance, deploying your Python project to a Virtual Private Server (VPS) is the industry standard. Hostinger VPS Hosting provides an ideal, highly affordable environment pre-configured with Linux distributions such as Ubuntu, Debian, or AlmaLinux.
Step 1: Provision Your Hostinger VPS
-
Set up a Linux server instance on Hostinger (Ubuntu 22.04/24.04 LTS recommended).
-
Retrieve your server’s IP address and root login credentials from the Hostinger hPanel dashboard.
Step 2: Establish SSH Connection and Update System Packages
Open your local terminal (or PowerShell) and connect to your server:
ssh root@YOUR_HOSTINGER_SERVER_IP
Update your system repository packages and install Python build tools:
sudo apt update && sudo apt upgrade -y
sudo apt install python3 python3-pip python3-venv nginx git -y
Step 3: Deploy Project Files & Configure Virtual Environment
Transfer your project code to the server using Git or SFTP:
cd /var/www
sudo git clone https://github.com/yourusername/your-python-repo.git
cd your-python-repo
Always isolate your production dependencies using a Python virtual environment:
# Create virtual environment
python3 -m venv venv

# Activate virtual environment
source venv/bin/activate

# Install required project packages
pip install -r requirements.txt
Step 4: Configure Nginx as a Reverse Proxy (For Web Apps)
Create a new Nginx server block configuration:
sudo nano /etc/nginx/sites-available/pythonapp
Add the reverse proxy directive pointing to your WSGI server port (e.g., Gunicorn running on port 8000):
server {
    listen 80;
    server_name yourdomain.com www.yourdomain.com;

    location / {
        proxy_pass http://127.0.0.1:8000;
        proxy_set_header Host $host;
        proxy_set_header X-Real-IP $remote_addr;
        proxy_set_header X-Forwarded-For $proxy_add_x_forwarded_for;
    }
}
Enable the Nginx configuration and restart the service:
sudo ln -s /etc/nginx/sites-available/pythonapp /etc/nginx/sites-enabled/
sudo nginx -t
sudo systemctl restart nginx
Real-World Benefits for Students, Developers, and Freelancers
| Target Group | Practical Real-World Benefits |
| Students & Learners | Gain hands-on Linux sysadmin skills, understand server architecture, and host portfolio projects live on custom domains for potential employers. |
| Freelancers & Agencies | Deliver fully automated backend workflows for clients, host custom SaaS micro-tools, and generate recurring revenue through hosted web solutions. |
| Software Engineers | Build scalable production microservices, manage continuous integration queues, and isolate project environments with maximum security and speed. |
Production Best Practices for Server-Side Python
-
Never Run Scripts as Root: Create a dedicated, non-root user with sudo privileges to execute scripts securely.
-
Environment Variables: Store confidential database credentials and API keys in a
.envfile using libraries likepython-dotenvinstead of hardcoding them into source files. -
Automated Log Rotation: Configure logging tools to record outputs into external log files and rotate them regularly to prevent server disk space exhaustion.
-
SSL/TLS Encryption: Protect web traffic by installing free Let’s Encrypt SSL certificates using Certbot (
sudo apt install certbot python3-certbot-nginx).
Ready to Deploy Your Python Scripts with 99.9% Uptime?
To run persistent Python automation scripts, web scrapers, and web applications efficiently, you need high-performance cloud hardware backed by dedicated compute resources and full root access.
Hostinger VPS Hosting provides high-speed NVMe storage, dedicated IPv4 address allocation, robust security features, and seamless scalability designed for Python developers and web creators.
Exclusive Discount for Developers & Web Creators
Take advantage of an EXCLUSIVE 20% DISCOUNT on all Hostinger web hosting and cloud VPS packages today!
Secure enterprise-grade compute power, lightning-fast bandwidth, and full Linux terminal access at an unbeatable rate.
Claim Your 20% Off Hostinger Hosting Discount Now
Launch your Python projects on Hostinger today and experience enterprise-level speed, rock-solid security, and uninterrupted 24/7 uptime.