
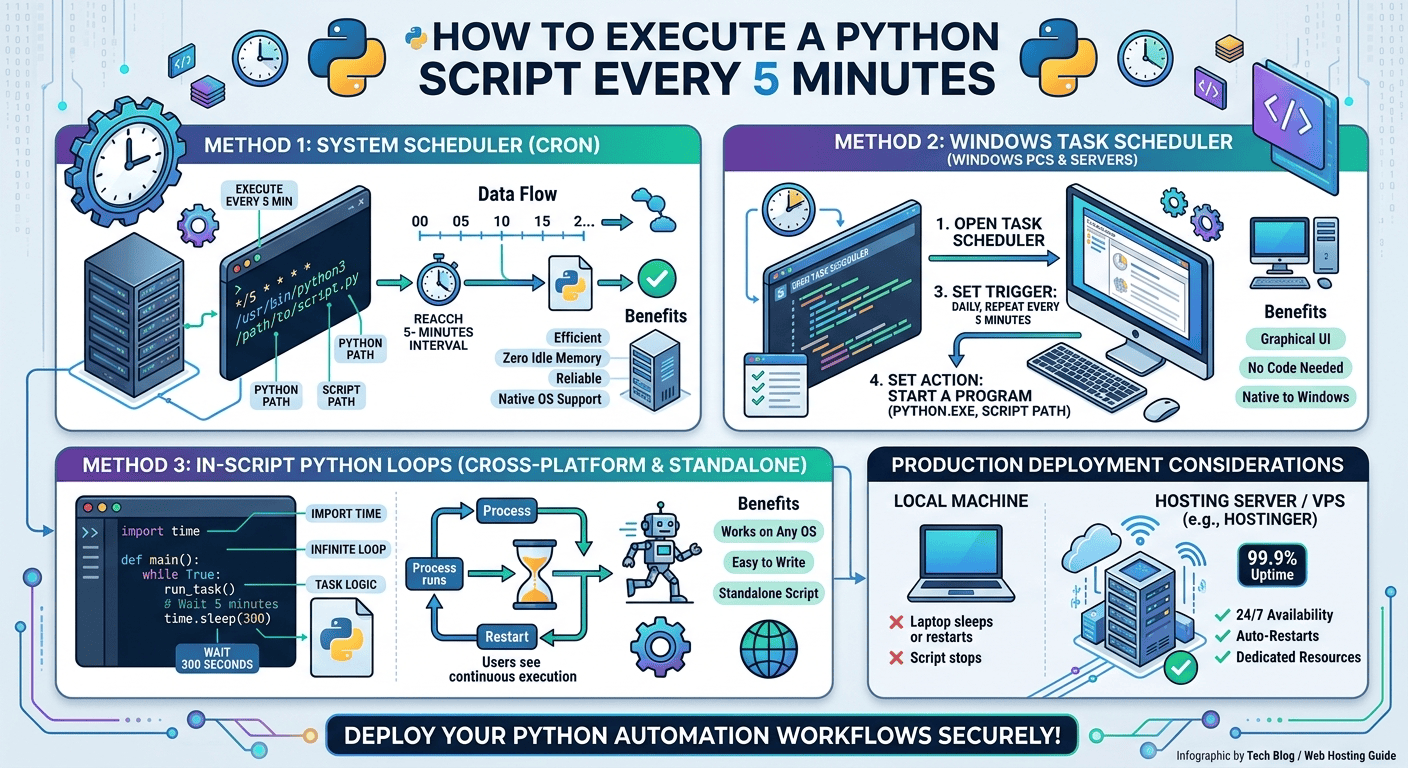
To execute a Python script every 5 minutes on Linux or server environments, set up a cron job using the expression */5 * * * * /usr/bin/python3 /path/to/script.py. On Windows systems, configure a task using Task Scheduler, or embed an in-script loop using Python’s time.sleep(300) or the schedule library.
3 Core Ways to Schedule a Python Script Every 5 Minutes
Automating Python scripts at fixed intervals is a core requirement for web scraping, data collection, API polling, system health monitoring, and automated notifications. Depending on your operating system, hosting environment, and application design, you can choose from three main implementation strategies:
| Execution Method | Best For | Pros | Cons |
| System Cron Jobs (Linux/macOS) | Server deployment & background tasks | Native OS support, zero memory overhead when idle | Requires Unix-based environment |
| Windows Task Scheduler | Desktop automation on Windows | Native graphical interface, no code changes required | Requires PC/Server to remain powered on |
| In-Script Python Loops | Cross-platform standalone scripts | Works on any OS, easy to write and debug | Process must remain running continuously in memory |
Method 1: Operating System Schedulers (Cron Jobs)
Using native system schedulers is the most reliable, resource-efficient way to execute recurring scripts because the operating system manages execution, starting the Python process only when needed and closing it immediately afterward.
Setting Up a Cron Job on Linux / macOS
Cron is a time-based job scheduler in Unix-like operating systems.
Step 1: Open the Crontab Editor
Open your terminal and run the crontab edit command:
Bash
crontab -e
Step 2: Understand the Cron Syntax
Cron expressions consist of five fields followed by the command:
Plaintext
*  *  *  *  *  command_to_execute
│  │  │  │  │
│  │  │  │  └── Day of week (0 - 6) (Sunday=0)
│  │  │  └───── Month (1 - 12)
│  │  └──────── Day of month (1 - 31)
│  └─────────── Hour (0 - 23)
└────────────── Minute (0 - 59)
To run a task every 5 minutes, use the step value syntax */5 in the minute field.
Step 3: Add the Cron Entry
Add the following line at the bottom of your crontab file:
Bash
*/5 * * * * /usr/bin/python3 /home/user/scripts/monitor.py >> /home/user/scripts/output.log 2>&1
-
/usr/bin/python3: The absolute path to your Python interpreter (find yours by runningwhich python3). -
/home/user/scripts/monitor.py: The absolute path to your Python script. -
>> /home/user/scripts/output.log 2>&1: Redirects both standard output (stdout) and error logs (stderr) to a log file for debugging.
Method 2: Deploying 24/7 Automated Scripts on Cloud Hosting
Running scheduled scripts on a personal laptop or desktop has major limitations: if your computer goes to sleep, restarts, or loses Wi-Fi connection, your scheduled tasks stop running. For mission-critical web scrapers, automated trading bots, or client notifications, you need a dedicated cloud hosting server with 99.9% uptime.
Automating Python Scripts via Hostinger hPanel
If you are using Hostinger, setting up recurring Python scripts is simple through the built-in Cron Jobs manager in hPanel.
-
Log in to your Hostinger hPanel dashboard.
-
Navigate to Advanced > Cron Jobs.
-
Under Custom Cron Job, select Custom for interval settings.
-
Set the schedule to run every 5 minutes (
*/5 * * * *). -
In the Command field, enter your Python executable and script path:
Bash
/usr/bin/python3 /home/u123456789/public_html/scripts/tracker.py -
Click Save to activate the task.
Automating via Hostinger VPS (Virtual Private Server)
For scripts requiring virtual environments, external dependencies, or high concurrency, a Hostinger VPS provides full root access over SSH:
-
Connect to your Hostinger VPS via SSH:
Bash
ssh root@your-vps-ip -
Create a Python virtual environment and install dependencies:
Bash
python3 -m venv /opt/myenv /opt/myenv/bin/pip install requests beautifulsoup4 -
Open
crontab -eand add the execution string using your virtual environment interpreter:Bash
*/5 * * * * /opt/myenv/bin/python /opt/scripts/scraper.py >> /var/log/python_cron.log 2>&1
Method 3: Windows Task Scheduler
If you are developing locally on Windows, you can automate execution through Task Scheduler without installing third-party tools.
Step 1: Open Task Scheduler
Press Win + R, type taskschd.msc, and press Enter.
Step 2: Create a Basic Task
-
Click Create Task in the right-hand Actions panel.
-
Give your task a name (e.g.,
Python_5Min_Script). -
Select Run whether user is logged on or not if you want it to run continuously.
Step 3: Configure the Trigger
-
Go to the Triggers tab and click New.
-
Set Begin the task to On a schedule.
-
Select Daily, then under Advanced settings, check Repeat task every: and select 5 minutes.
-
Set for a duration of: to Indefinitely. Click OK.
Step 4: Configure the Action
-
Go to the Actions tab and click New.
-
Set Action to Start a program.
-
In Program/script, enter the path to
python.exe(e.g.,C:\Python311\python.exe). -
In Add arguments, enter the script name or full path (e.g.,
C:\Scripts\app.py). -
In Start in, enter the folder path containing your script (e.g.,
C:\Scripts\). -
Click OK to save.
Method 4: Pure Python In-Script Scheduling
If you prefer cross-platform portability without modifying OS-level settings, you can embed the scheduling logic directly into your Python code using built-in or third-party libraries.
Option A: Standard Library time.sleep() Loop
The simplest approach uses an infinite while loop paired with time.sleep().
Python
import time
import datetime

def my_task():
    print(f"[{datetime.datetime.now()}] Running script task...")
    # Add your automation logic here (e.g., API calls, database updates)

def main():
    INTERVAL = 300  # 300 seconds = 5 minutes
    while True:
        try:
            my_task()
        except Exception as e:
            print(f"Error during execution: {e}")

        # Wait 5 minutes before next execution
        time.sleep(INTERVAL)

if __name__ == "__main__":
    main()
Option B: Using the schedule Library
For cleaner syntax and readable job declarations, install the schedule package:
Bash
pip install schedule
Python
import schedule
import time
import datetime

def job():
    print(f"[{datetime.datetime.now()}] Executing scheduled 5-minute task.")

# Schedule job every 5 minutes
schedule.every(5).minutes.do(job)

print("Scheduler started. Press Ctrl+C to exit.")

while True:
    schedule.run_pending()
    time.sleep(1)
Real-World Benefits for Students, Developers, and Freelancers
Automating Python execution unlocks real-world value across web development and data science workflows:
-
For Students: Automate university portal checks, track tuition grade postings, or build portfolio projects like price-monitoring bots without manually running terminal commands.
-
For Freelancers: Deliver background automation tools to clients (e.g., syncing inventory between WooCommerce and Shopify, auto-replying to lead generation forms, or backing up databases).
-
For Web Developers: Poll third-party REST APIs every 5 minutes to update local caching layers, reduce external latency, and avoid hitting API rate limits during peak traffic.
Best Practices for Recurring Python Scripts
When running scripts automatically every 5 minutes, follow these structural guidelines to prevent memory leaks and server crashes:
-
Use Absolute Paths: Always reference absolute file paths (
/home/user/data.jsoninstead of./data.json) inside cron jobs, as system schedulers execute from root user directories by default. -
Implement Error Handling: Wrap core execution logic inside
try/exceptblocks so that temporary network timeouts or database disconnects do not crash the script permanently. -
Use Robust Logging: Replace
print()statements with Python’s built-inloggingmodule to output timestamps, execution status, and detailed stack traces to disk. -
Prevent Job Overlap: If your script takes longer than 5 minutes to complete under heavy load, use file locking libraries (like
lockfileorfilelock) to ensure only one instance executes at a time.
Deploy Your Python Scripts 24/7 with Hostinger
Running automated Python scripts locally on your desktop limits uptime and risks downtime during system updates or network interruptions. Transitioning your automation workflows to cloud servers ensures round-the-clock reliability.
Exclusive 20% Hosting Discount
Elevate your web infrastructure with fast, secure, and affordable hosting. Whether you need an entry-level Cloud plan with built-in Cron management or a high-performance VPS for resource-heavy Python automation, Hostinger provides the ultimate developer hosting environment.
Get started today and enjoy an EXCLUSIVE 20% DISCOUNT on all eligible hosting plans!
Claim Your 20% Hostinger Discount Here
-
Direct Access Link: https://www.hostinger.com/pk?REFERRALCODE=Meerub
Deploy your web scrapers, API monitors, and scheduled Python workflows to Hostinger today for 99.9% uptime and high performance!