
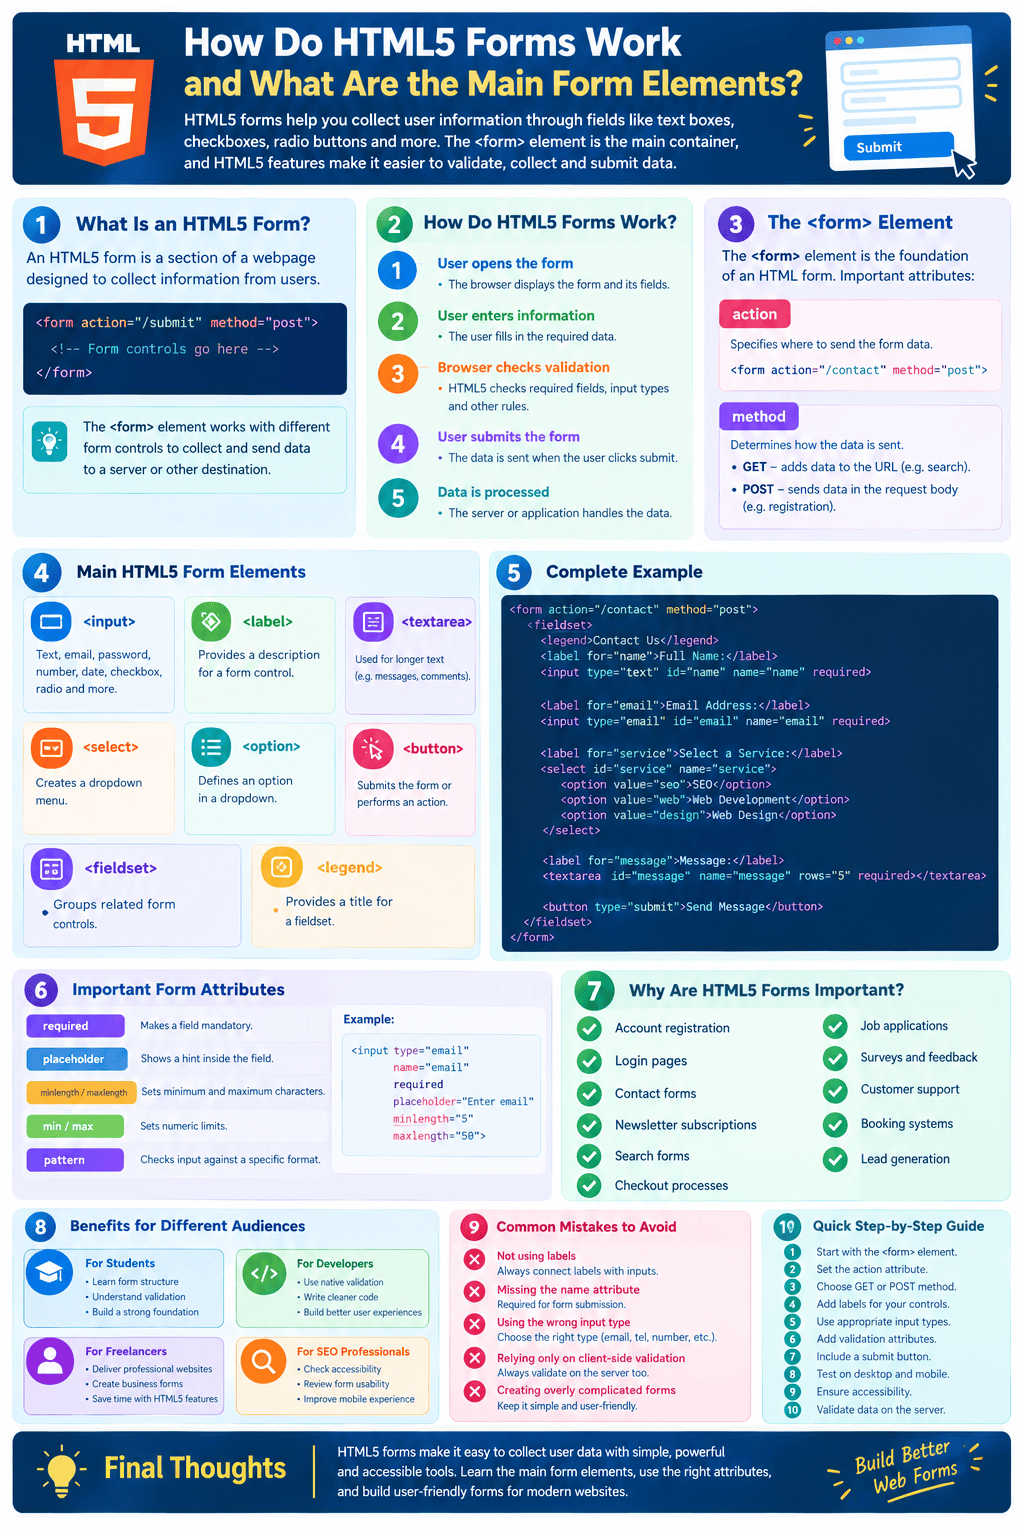
HTML5 forms allow websites to collect information from users through fields such as text boxes, email inputs, checkboxes, radio buttons, and submit buttons. The <form> element works as the main container, while HTML5 form elements and attributes help collect, validate, and send user data to a server or other processing system.
Forms are one of the most important parts of modern websites. Whenever you sign up for an account, contact a business, search for information, submit an application, or purchase something online, you are likely interacting with an HTML form.
HTML5 provides a collection of elements and input types that make it easier for developers to build functional, accessible, and user-friendly forms. It also includes built-in browser validation features that can reduce the amount of custom JavaScript needed for basic validation.
For beginners, understanding HTML5 forms is an important step toward becoming comfortable with web development.
What Is an HTML5 Form?
An HTML5 form is a section of a webpage designed to collect information from users.
A basic form can look like this:
<form>
  <label for="name">Name:</label>
  <input type="text" id="name" name="name">

  <button type="submit">Submit</button>
</form>
The <form> element acts as the main container. Inside it, you can add different form controls such as:
- Text fields
- Email fields
- Password fields
- Checkboxes
- Radio buttons
- Dropdown menus
- Date fields
- File uploads
- Textareas
- Submit buttons
The browser collects the values entered by the user and, when the form is submitted, can send those values to a server or another destination specified by the developer.
How Do HTML5 Forms Work?
The basic form process can be understood in several steps.
Step 1: The User Opens the Form
The browser displays the form and its controls.
For example, a registration form might ask for:
- Full name
- Email address
- Password
- Date of birth
Step 2: The User Enters Information
The user enters data into the appropriate fields.
For example:
Name: Ahmed Khan
Email: ahmed@example.com
Password: ********
Step 3: The Browser Performs Basic Validation
HTML5 can check certain requirements before allowing the form to be submitted.
For example, an email field can be defined as:
<input type="email" name="email" required>
The required attribute tells the browser that the field must contain a value.
The type="email" attribute tells the browser that the field is intended for an email address.
Step 4: The User Submits the Form
The user clicks the submit button:
<button type="submit">Submit</button>
The browser then processes the form according to its configuration.
Step 5: The Data Is Sent for Processing
A form can use the action attribute to specify where the submitted data should be sent.
For example:
<form action="/submit-form" method="post">
The server-side application can then process the submitted information.
The <form> Element
The <form> element is the foundation of an HTML form.
A common structure is:
<form action="/submit" method="post">
  <!-- Form controls go here -->
</form>
Two important attributes are action and method.
The action Attribute
The action attribute specifies the URL or endpoint where the form data should be submitted.
Example:
<form action="/contact" method="post">
When the user submits the form, the browser sends the form data to the specified destination.
The method Attribute
The method attribute determines how the browser sends the form data.
The two commonly used methods are:
GETPOST
GET Method
With GET, form data is generally appended to the URL as query parameters.
Example:
<form action="/search" method="get">
  <input type="search" name="query">
  <button type="submit">Search</button>
</form>
A search might result in a URL containing something like:
/search?query=html5
GET is commonly useful for searches and other requests where the parameters can appropriately appear in the URL.
POST Method
With POST, the form data is sent in the request body rather than being appended to the URL.
Example:
<form action="/register" method="post">
POST is commonly used when submitting information that should be processed by a server, such as account registration or other data submissions.
The choice between GET and POST depends on what the form is designed to do.
Main HTML5 Form Elements
HTML5 provides several elements for collecting and organizing user input.
1. <input>
The <input> element is one of the most commonly used form elements.
Its behavior changes depending on the type attribute.
Text Input
<input type="text" name="username">
This creates a basic single-line text field.
Email Input
<input type="email" name="email">
This is designed for email addresses and provides appropriate browser behavior and validation.
Password Input
<input type="password" name="password">
Characters entered into a password field are visually hidden by the browser.
Number Input
<input type="number" name="age">
This is useful when the expected value is numeric.
Date Input
<input type="date" name="birthdate">
This provides a browser-controlled date input interface where supported.
Checkbox
<input type="checkbox" name="newsletter" value="yes">
Checkboxes allow users to select one or multiple options.
Radio Button
<input type="radio" name="plan" value="basic">
<input type="radio" name="plan" value="premium">
Radio buttons are commonly used when the user should choose one option from a group.
The buttons share the same name value so the browser treats them as a group.
2. <label>
The <label> element provides a text description for a form control.
Example:
<label for="email">Email Address:</label>
<input type="email" id="email" name="email">
The for attribute connects the label with the input’s id.
Labels are important for usability and accessibility because users can clearly understand what information each field requires.
Clicking a label can also activate the associated control in many cases.
3. <textarea>
The <textarea> element is used for longer text.
It is commonly used for:
- Messages
- Comments
- Feedback
- Descriptions
- Support requests
Example:
<label for="message">Your Message:</label>

<textarea id="message" name="message" rows="5" cols="40"></textarea>
Unlike a standard text input, <textarea> can contain multiple lines.
4. <select>
The <select> element creates a dropdown menu.
Example:
<label for="country">Country:</label>

<select id="country" name="country">
  <option value="pk">Pakistan</option>
  <option value="us">United States</option>
  <option value="uk">United Kingdom</option>
</select>
Dropdowns are useful when users need to select one option from a predefined list.
The <option> Element
Each choice inside a <select> element is represented by an <option>.
<option value="seo">SEO</option>
<option value="web">Web Development</option>
<option value="design">Web Design</option>
5. <button>
The <button> element creates a clickable button.
For submitting a form, you can use:
<button type="submit">Submit Form</button>
Other button types include:
<button type="button">Click Me</button>
<button type="reset">Reset</button>
A button with type="submit" submits the associated form, while type="reset" resets form controls to their initial values.
6. <fieldset> and <legend>
These elements are useful for grouping related form controls.
Example:
<fieldset>
  <legend>Contact Information</legend>

  <label for="name">Name:</label>
  <input type="text" id="name" name="name">

  <label for="email">Email:</label>
  <input type="email" id="email" name="email">
</fieldset>
<fieldset> groups related controls, while <legend> provides a description for that group.
This can make complex forms easier to understand and navigate.
Important HTML5 Form Attributes
HTML5 provides several attributes that make forms more useful.
required
The required attribute tells the browser that the user must provide a value.
<input type="email" name="email" required>
placeholder
The placeholder attribute provides a short hint inside an input.
<input type="text" placeholder="Enter your full name">
A placeholder should not normally replace a proper <label.
minlength and maxlength
These attributes can control the minimum and maximum number of characters.
<input type="text" name="username" minlength="3" maxlength="30">
min and max
These attributes can define numeric limits.
<input type="number" name="age" min="18" max="100">
pattern
The pattern attribute can specify a regular expression that the input should match.
<input type="text" name="code" pattern="[A-Z]{3}[0-9]{3}">
This can be useful when a field must follow a specific format.
Complete HTML5 Form Example
Here is a simple contact form that combines several concepts:
<form action="/contact" method="post">

  <fieldset>
    <legend>Contact Us</legend>

    <label for="name">Full Name:</label>
    <input
      type="text"
      id="name"
      name="name"
      required
    >

    <br><br>

    <label for="email">Email Address:</label>
    <input
      type="email"
      id="email"
      name="email"
      required
    >

    <br><br>

    <label for="service">Select a Service:</label>
    <select id="service" name="service">
      <option value="seo">SEO</option>
      <option value="web-development">Web Development</option>
      <option value="web-design">Web Design</option>
    </select>

    <br><br>

    <label for="message">Message:</label>
    <textarea
      id="message"
      name="message"
      rows="5"
      required
    ></textarea>

    <br><br>

    <button type="submit">Send Message</button>

  </fieldset>

</form>
This example demonstrates how multiple HTML5 form elements can work together to create a functional interface.
HTML5 Form Validation
One of the useful features of HTML5 forms is built-in browser validation.
For example:
<input
  type="email"
  name="email"
  required
>
The browser can check whether the field has been completed and whether the entered value is consistent with the expected email input type.
Other validation-related attributes include:
requiredminlengthmaxlengthminmaxpattern
However, client-side validation should not be treated as a complete security mechanism. A server should validate submitted data as well because users can bypass or manipulate browser-side checks.
Why Are HTML5 Forms Important for Websites?
Forms allow websites to interact with users instead of simply displaying information.
They are used for:
- Account registration
- Login pages
- Contact forms
- Newsletter subscriptions
- Search forms
- Checkout processes
- Job applications
- Customer surveys
- Feedback forms
- Booking systems
- Support requests
Without forms, many websites would have limited ways to collect information from their users.
Benefits for Students, Developers, and Freelancers
For Students
Learning HTML5 forms teaches students how websites collect user input. Forms also provide a practical introduction to validation, HTTP methods, accessibility, and eventually backend development.
For Developers
Developers can use HTML5’s native form controls and validation features to create reliable interfaces while reducing unnecessary custom code for basic requirements.
For Freelancers
Freelancers frequently build websites for businesses that require contact forms, quote requests, lead-generation forms, and newsletter subscriptions. Understanding HTML5 forms helps freelancers create better front-end interfaces and communicate more effectively with backend developers.
For SEO Professionals
Forms can also be relevant when auditing websites. Important considerations include whether form controls are accessible, whether important content is hidden behind interactions, whether forms work properly on mobile devices, and whether the page provides a good user experience.
Common HTML5 Form Mistakes to Avoid
1. Not Using Labels
Avoid relying only on placeholders.
Use:
<label for="phone">Phone Number:</label>
<input type="tel" id="phone" name="phone">
2. Missing the name Attribute
When form data needs to be submitted, controls generally need appropriate name attributes so their values can be included in the submitted form data.
3. Using the Wrong Input Type
Instead of using:
<input type="text">
for every field, use appropriate types such as:
<input type="email">
<input type="tel">
<input type="number">
<input type="date">
when they accurately represent the expected data.
4. Relying Only on Client-Side Validation
Browser validation improves user experience, but server-side validation is still important when processing submitted data.
5. Creating Overly Complicated Forms
Only request information that is necessary. A shorter and clearer form can provide a better user experience than one containing unnecessary fields.
Step-by-Step Process for Building an HTML5 Form
If you are a beginner, follow this workflow:
Step 1: Start with the <form> element.
Step 2: Decide where the submitted data should go using the action attribute.
Step 3: Choose the appropriate method, such as GET or POST.
Step 4: Add <label> elements for your controls.
Step 5: Select appropriate input types.
Step 6: Add required and other validation attributes where appropriate.
Step 7: Add a submit button.
Step 8: Test the form on desktop and mobile devices.
Step 9: Make sure the form is accessible and easy to understand.
Step 10: Validate submitted data on the server before processing it.

Final Thoughts
HTML5 forms provide the foundation for collecting user information on modern websites. The <form> element acts as the main container, while elements such as <input>, <label>, <textarea>, <select>, <option>, <button>, <fieldset>, and <legend> help create different types of form interfaces.
HTML5 also provides useful input types and validation attributes such as email, required, minlength, maxlength, min, max, and pattern. These features make it easier to build forms that are clear and user-friendly.
For beginners, the best way to learn forms is to start with a simple contact form and gradually experiment with different input types, validation rules, and submission methods. Once you understand how HTML5 forms work, you will have a strong foundation for learning JavaScript form handling, backend development, APIs, and more advanced web applications.